You will use the Story Outline you created in Project 1.
You will use CANVA and create a PHOTO-STORYBOARD (like we did with Spiderman) for each of your scenes.
You should have a minimum of 3 scenes.
Each scene has to have
NAME OF THE SHOT
INTERIOR or EXTERIOR Description
Each scene should have
A background Image
At least one character in each shot
You will create this in CANVA
Create a Design > Education Presentation
and save it as a PDF and Upload it here.
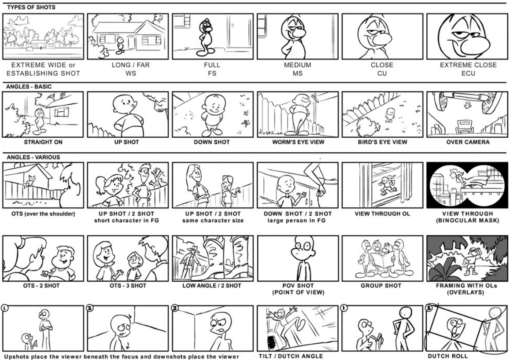
LIST OF SHOTS:
Establishing shot – a shot from VERY far away, the character is usually very small
Wide shot or long shot (WS or LS) – a shot from far away, you can see the full body of the character and an important location
Mid shot or medium shot (MS) – a shot that shows the character from the waist up
Two-shot – a shot that shows two characters
Over the shoulder (OTS) – a shot that shows the shoulder of a character, usually talking to another character
Close up (CU) – a close-up shot of the face of the character
Extreme close-up (ECU) – a shot of the eyes/mouth or body part of the character
