Camera Basics – Movement & Multi-Cameras
Download these files to use with our After Effects Cameras-
this is a zip file, download it and then double click to open the folder.
Look at this document to see the various ways cameras are used to tell a story
anatomy_and_basics_of_a_storyboard
Camera Focus – Focus, Link Focus, Null Control, Auto-Orient
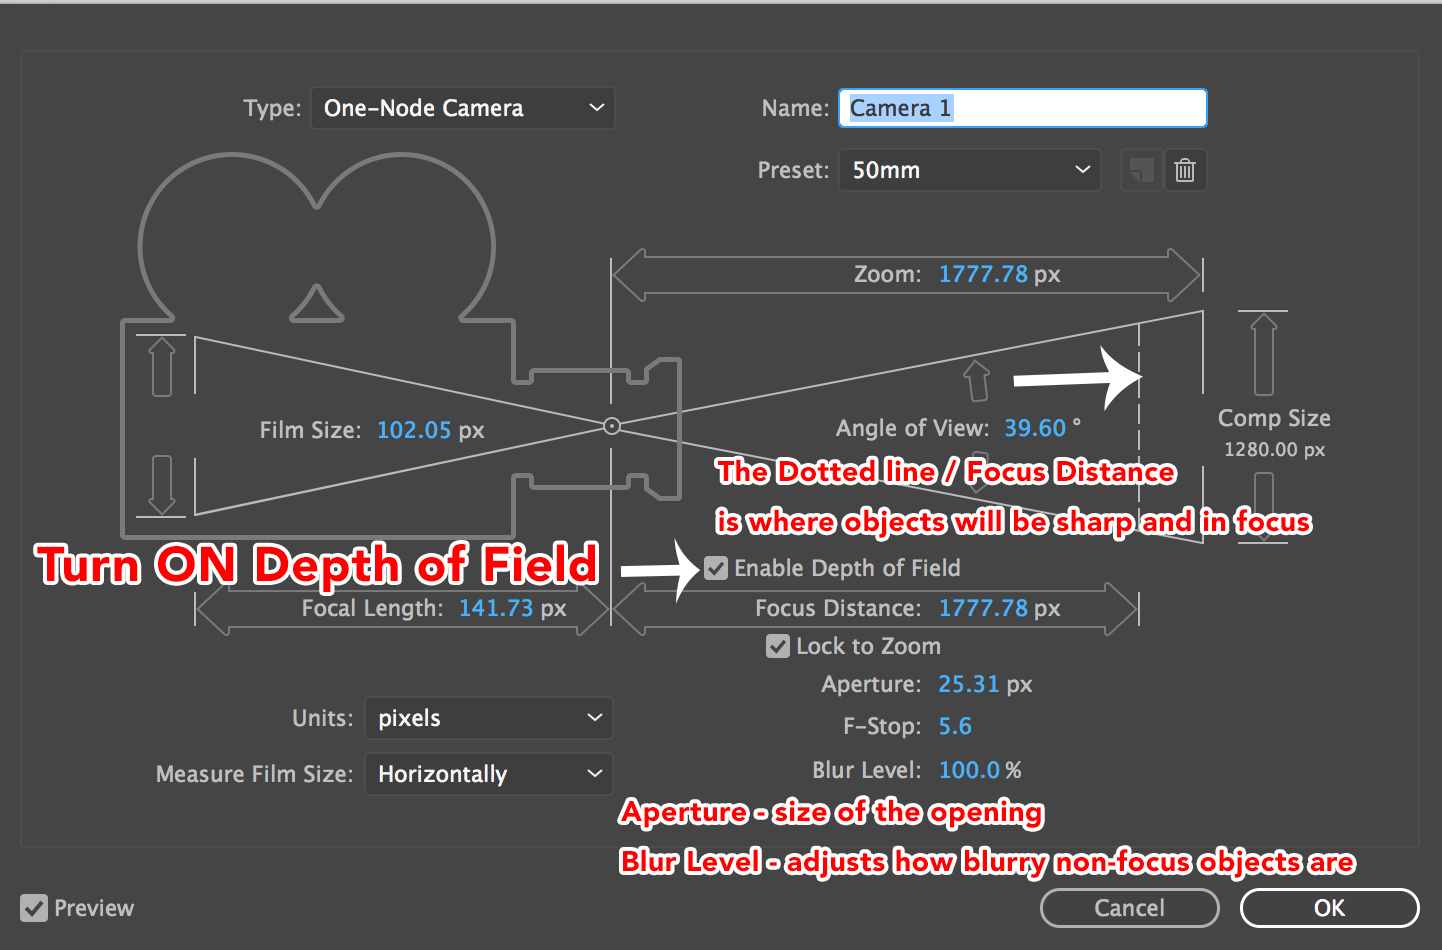
*See Image for explanation of camera settings
Unified Camera Tool
Use this tool to control the camera with the mouse
• Left Click: Orbit
• Right Click: Track Z
• Middle (Wheel) Click: Track XY
Focus Basics:
- Create a composition with three layers
*Use the images I provided above of the clouds, house and dog.
Background – Clouds
Middle Ground – House
Foreground – Dog - Create a Camera –
Layer > New > Camera
Type: ONE NODE
Preset: 50mm
Units: Pixels
Measure Film Size: Horizontally
CHECK the BOX: Enable Depth of Field
CHECK the BOX: Lock to Zoom
Change the ZOOM: 500px - Turn on the 3D symbol so all layers have 3D controls
- Now adjust the size and placement of the images so that you have a good composition.
- Move the Background Image (Clouds)
In Position put 1000 in Z - Move the Middleground Image (House)
In Position put 500 in Z - Leave the Foreground Image (Dog) where it is.
- Switch your view to CUSTOM VIEW #1, Notice where the camera is.
- Switch back to ACTIVE CAMERA and..
- Open the Camera Layer > Camera Options
- Increase the APERTURE to 250 pixels
- Open the Camera layer and a key frame in the FOCUS DISTANCE.
- Now move your time line ahead and change the FOCUS DISTANCE setting to match the Z POSITION of the Middleground Image by changing it to 1000 pixels.
- Now move your time line ahead and change the FOCUS DISTANCE setting to match the Z POSITION of the Background Image by changing it to 1500 pixels.
- You should now see the focus changing!
- Experiment!
Link Focus – TWO NODE CAMERA
This one makes the camera stay in focus on and LINKED on an object *it can get a bit glitchy if you go too far with your Z axis
- Make a Stroked Shape- a colorful Ring
- Make a TYPE LAYER
- Make the layers 3D enabled
- Move the Stroked Shape in POSITION to 1000 in Z
- Create a Camera –
Layer > New > Camera
Type: Two-Node Camera
Preset: 50mm
Units: Pixels
Measure Film Size: Horizontally
CHECK the BOX: Enable Depth of Field
CHECK the BOX: Lock to Zoom
Change the ZOOM: 500px
Press OK - Select BOTH the CAMERA LAYER and your TYPE LAYER by Holding SHIFT and selecting both layers.
- Go to the top of the screen, LAYER> CAMERA> LINK FOCUS DISTANCE TO LAYER
- Experiment with moving your TEXT Layer and see how other objects will stay blurry as you move it.
- PROBLEM – if you’re TEXT (Linked) Layer moves beyond the Distance of Camera’s Original Zoom/Focus Distance it will stop working.
Null Control
Best and easiest way to control your camera
- Create a new composition.
Add a TYPE LAYER, lock the layer.
Create A Stroked Circle with No Fill. - Turn on the 3D Button for the layers
- Move the POSITION of the Stroked Circle and change the Z position to 500
- Create a One-Node CAMERA
Create a Camera –
Layer > New > Camera
Type: ONE NODE
Preset: 50mm
Units: Pixels
Measure Film Size: Horizontally
CHECK the BOX: Enable Depth of Field
CHECK the BOX: Lock to Zoom
Change the ZOOM: 500px - Create a NULL LAYER
- Change the PARENT setting on your CAMERA to the NULL LAYER
- Experiment with Rotation and Movement in the NULl LAYER! It will control the Camera!
Auto Orient
In this case you can make Objects Auto-Orient to always face the camera
*Same steps as above but one final change
- Create a new composition.
Add a TYPE LAYER
Create 3 Circles with No Fill - Turn on the 3D Button for each
- Adjust each Circle and change its color and its ORIENTATION So that they are offset and surround the TYPE
- Create a One-Node CAMERA
- Create a NULL LAYER
- Change the PARENT setting on your CAMERA to the NULL LAYER
- Experiment with Rotation and Movement in the NULl LAYER! It will control the Camera!
- Now click on your TEXT LAYER. Right-Click and go to TRANSFORM>AUTO ORIENT> ORIENT TOWARDS CAMERA
- The object will stay oriented towards the camera!